Wednesday, April 22, 2009

Bazaar

Introduction

Bazaar (or bzr) is a project of Canonical to develop an open source distributed version control system that is powerful, friendly, and scalable. ... It is used by Launchpad for managing revisions with packages. If you have never created a Launchpad project because bzr scared you, fear no more!

To get started, you should install the bzr application by running:
Code:
sudo apt-get install bzr
Bazaar relies on SSH keys to transfer files to your Launchpad account. If you don't have a SSH key, you can follow the next steps to get your SSH key on Launchpad. If you already have your SSH key on Launchpad, you can skip this section to "Using Bazaar".

Launchpad / SSH Key

To create your SSH key, open a terminal and run:
Code:
ssh-keygen -t dsa
Leave the first prompt (for the key location) at default, by pressing Enter, then enter a passphrase for your private SSH key. When complete, run:
Code:
cat ~/.ssh/id_dsa.pub
Copy your public key, from the previous command, then go to Launchpad to edit your SSH key:
https://launchpad.net/~username/+editsshkeys

Paste the key into "Add an SSH key" then click "Import Public Key". You should be all set now!


Using Bazaar

Suppose you found a project on Launchpad, that you wanted to help out with, or wanted to download their project source to tweak it to your own likings. I'll give my perlbot project as a quick example. If you go to:
https://code.launchpad.net/~drsmall/perlbot/trunk

You can view the trunk, and revisions for that project. If you wanted to download a copy of this trunk to your local system, you would issue this command:
Code:
bzr pull lp:perlbot
This would then download the source files of perlbot to ~/perlbot on your system. You can then execute, run, or send the revisions back to the trunk (with proper permission).

Ok. So let's say you want to start your own branch, where you can host your own edited version of some software, or it could be something you created by yourself that you want to be worked on by a team. Gather up all of the files you want to placed in your launchpad branch, and place them in one directory. cd to this directory, and then run:
Code:
bzr init
This makes the directory into a version branch. If you take the time to notice, there is now a hidden directory called .bzr in here. This is where all the revisions, and files are stored to be used by bzr. Now, add all of the files to the branch:
Code:
bzr add *
It is a good idea to get in the habit of running the next command for checking the difference between your last revision and the current one. You shouldn't have to do this on your first time around, though.
Code:
bzr diff
With this next step, we are committing our edits into the current revision. It is a good idea to label your revisions with meaningful comments.
Code:
bzr commit -m "Revision 1 Comment"
You may now upload your revision to your Launchpad branch. If the branch does not exist, it will be created. You can have multiple branches, so name them accordingly. This command may take a few minutes, but it is creating the branch, uploading your files, creating revisions and alot of other things.
Code:
bzr push lp:~user/projectname/branchname

Commands

Make directory a bzr branch:
Code:
bzr init
Download a branch:
Code:
bzr pull 
Update a branch:
Code:
bzr push 
Add files to branch:
Code:
bzr add 
Check the difference between revisions:
Code:
bzr diff
Commit the revision:
Code:
bzr commit -m "Revision Comment"
(These are just the basic commands. You can find the complete list of commands by running 'man bzr' in your terminal.)

Sunday, April 19, 2009

Performance Timer ..


class MyTimer {         
private final long start;              
public MyTimer() {             
start = System.currentTimeMillis();         
}              
public long getElapsed() {             
return System.currentTimeMillis() - start;         
}     
}


Saturday, April 18, 2009

Summary of techniques used in Dynamo and their advantages.

From "Amazon Dynamo" paper ..

Table 1: Summary of techniques used in Dynamo and their advantages.

Problem

Technique

Advantage

Partitioning

Consistent Hashing

Incremental Scalability

High Availability for writes

Vector clocks with reconciliation during reads

Version size is decoupled from update rates.

Handling temporary failures

Sloppy Quorum and hinted handoff

Provides high availability and durability guarantee when some of the replicas are not available.

Recovering from permanent failures

Anti-entropy using Merkle trees

Synchronizes divergent replicas in the background.

Membership and failure detection

Gossip-based membership protocol and failure detection.

Preserves symmetry and avoids having a centralized registry for storing membership and node liveness information.


Object versioning

From (http://ez.no/doc/ez_publish/technical_manual/3_9/concepts_and_basics/content_management/object_versioning)

Object versioning

eZ publish comes with a built in versioning system which is implemented at the object level. This mechanism makes it possible to have several versions of the contents (attributes) of an object. It basically provides a generic, out-of-the-box version control framework that can be used with any kind of content. The different versions are encapsulated by the object itself. The following illustration shows a more detailed example of the object structure seen from the outside world.

Example of a content object that consists of two versions.

Example of a content object that consists of two versions.

Every time an object is edited, a new version of the object's contents will be created. It is always the new version that will be edited, the old version(s) remains untouched. This is how eZ publish keeps track of changes made by various users. An accidental or unwanted change can thus be undone by simply reverting an object back to the previous version.

Version limitations

Since every edit procedure results in the creation of a new version (unless the new version is discarded), the database can be quickly filled up by different versions of the same content. In order to prevent this problem, the versioning system can be limited to a certain number of versions per object. It is possible to assign different version limitations for different object types (different classes). The default limitation is 10, which means that every object can have a maximum number of 10 versions of its content. If the maximum count is reached, the oldest version will be automatically deleted and thus a free slot will be available for the new one. This is the default behavior. An alternative setting can be used to disallow the creation of new versions until an existing version is manually deleted by a user.

Version structure

A version consist of the following elements:

  • Version number
  • Creation time
  • Modification time
  • Creator
  • Status
  • Translations

Version number

Every version has a unique version number. This number is used by the system to organize and keep track of the different versions of an object. The version number is automatically increased for each version that is created inside an object.

Creation time

The creation time contains a timestamp pinpointing the exact date and time when the version was initially created. This information is set by the system and will remain the same regardless of what happens to the version.

Modification time

The modification time contains a timestamp revealing the exact date and time when the version was last modified. This information is set by the system every time the version is stored and when the version is finally published. When a version is published, the modification time of the object itself will be updated (it will simply be set to the same value as modification time of the version that was published).

Creator

The version's creator contains a reference to the user that created the version. Although a content object can only belong to a single user (revealed by the "Owner" field), each version may belong different users. The creator reference is set by the system when the version is created. It can not be manipulated and will not change even if the user who created the version is removed from the system.

Status

The state of a version is determined by its status. There are five possibilities:

  • Draft (0)
  • Published (1)
  • Pending (2)
  • Archived (3)
  • Rejected (4)

In eZ Publish versions 3.8 and later, there is an additional possibility: if a version of a content object is created but not modified (for example, if someone clicked an "Add comments" button but didn't actually post anything), the status of the version will be "Internal draft (5)". In the administration interface, status "5" drafts are called "untouched drafts". From 3.9, you can set the number of days, hours, minutes and seconds before an internal draft is considered old and removed by the "internal_drafts_cleanup.php" cronjob script. Another cronjob script called "old_drafts_cleanup.php" can be configured to remove status "0" drafts that have been in the system for a specified period of time.

A newly created version is a draft. This status will remain until that version becomespublished. Although an object can have many versions, there can only be one published version (the others are usually drafts and archived versions). The published version can be considered as the "current" version and it is the one that is accessed when the object is viewed. A published version can not become a draft. However, it will become archived as soon as another version is published. The following illustration shows how the versioning system actually works.

Overview of the object states.

Overview of the object states.

The illustration above shows the most common states of a content object. When a new object is created (step 1), eZ publish will also create a new draft version. Because the object has not been published yet, its status is set to draft and the current version is unknown. Storing the draft (steps 2a and 2b) will not change the state of the object. The only thing that will happen is that the contents of the draft will be stored in version 1. If the draft (which is the only existing version) is discarded, the object is completely removed from the system (step 2c). When the draft is published (step 2), both the draft and the object's states will be set to published. In addition, the current version will be set to 1, which reveals the currently published version of the object. When published, the contents of the object can be viewed by others. A published object can be removed/deleted from the system (step 3a). When removed, the object's state will be set to "Archived" and thus it will be in the trash. The object can be recovered from the trash to its previous state. Among other things, this involves the status field being set to "Published" again. When a published object is edited (step 4), the current version (version 1 in this case) will remain untouched and a completely new version will be created. The contents of the new version (version 2 in this case) will be a copy of the contents of the current version. Again, storing the draft (steps 4b and 4c) will not change the state of the object. If the draft is discarded (step 4a), it will be completely removed from the system and thus the object will be in the exact same state as it was in before it was edited. If the newly created and edited draft is published, it will become the current version of the object and thus the previous version (version 1 in this case) will be set to "Archived". Step 5a illustrates what would happen if the object (now with two versions) would be removed.

The pending and the rejected states are used by the collaboration system. When a version is waiting to be approved by an editor, the status is set to pending. If the version is approved, it will be automatically published and thus the status will be set to published. On the other hand, if a pending version is rejected by the editor, the status will be set to rejected.

A version can only be edited if it is a draft and it can only be edited by the same user who initially created it. In addition, rejected versions can also be edited. When a rejected version is edited, it will become a draft. Published and archived versions can not be edited. However, it is possible to make copies of them. When a published or an archived version is copied, the status of the copy is set to draft and thus it becomes editable. When/if the new draft is published, the system automatically sets the status of the previously published version to archived and the new draft will become the published version.

Translations

The actual contents of a version is stored inside different translations. A translation is a representation of the information in a specific language. In other words, the translation layer allows a version of the object's actual contents to exist in different languages. A version always has at least one translation of the content (which represents the data in the default/standard language).

Consistent Hashing

FRom Tom White's Blog (http://www.lexemetech.com/2007/11/consistent-hashing.html)


Consistent Hashing

I've bumped into consistent hashing a couple of times lately. The paper that introduced the idea (Consistent Hashing and Random Trees: Distributed Caching Protocols for Relieving Hot Spots on the World Wide Web by David Karger et al) appeared ten years ago, although recently it seems the idea has quietly been finding its way into more and more services, from Amazon'sDynamo to memcached (courtesy of Last.fm). So what is consistent hashing and why should you care?

The need for consistent hashing arose from limitations experienced while running collections of caching machines - web caches, for example. If you have a collection of n cache machines then a common way of load balancing across them is to put object o in cache machine number hash(o) mod n. This works well until you add or remove cache machines (for whatever reason), for then nchanges and every object is hashed to a new location. This can be catastrophic since the originating content servers are swamped with requests from the cache machines. It's as if the cache suddenly disappeared. Which it has, in a sense. (This is why you should care - consistent hashing is needed to avoid swamping your servers!)

It would be nice if, when a cache machine was added, it took its fair share of objects from all the other cache machines. Equally, when a cache machine was removed, it would be nice if its objects were shared between the remaining machines. This is exactly what consistent hashing does - consistently maps objects to the same cache machine, as far as is possible, at least.

The basic idea behind the consistent hashing algorithm is to hash both objects and caches using the same hash function. The reason to do this is to map the cache to an interval, which will contain a number of object hashes. If the cache is removed then its interval is taken over by a cache with an adjacent interval. All the other caches remain unchanged.

Demonstration

Let's look at this in more detail. The hash function actually maps objects and caches to a number range. This should be familiar to every Java programmer - the hashCode method on Object returns an int, which lies in the range -231 to 231-1. Imagine mapping this range into a circle so the values wrap around. Here's a picture of the circle with a number of objects (1, 2, 3, 4) and caches (A, B, C) marked at the points that they hash to (based on a diagram from Web Caching with Consistent Hashing by David Karger et al):


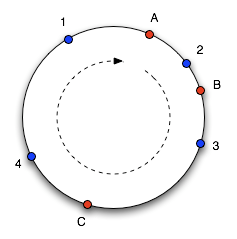
To find which cache an object goes in, we move clockwise round the circle until we find a cache point. So in the diagram above, we see object 1 and 4 belong in cache A, object 2 belongs in cache B and object 3 belongs in cache C. Consider what happens if cache C is removed: object 3 now belongs in cache A, and all the other object mappings are unchanged. If then another cache D is added in the position marked it will take objects 3 and 4, leaving only object 1 belonging to A.


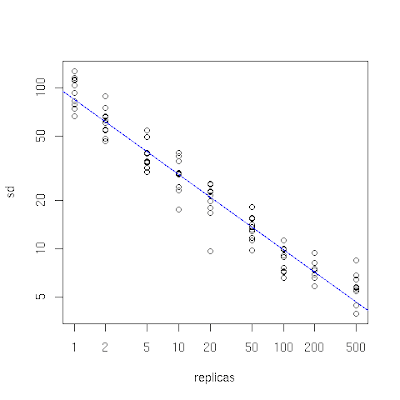
This works well, except the size of the intervals assigned to each cache is pretty hit and miss. Since it is essentially random it is possible to have a very non-uniform distribution of objects between caches. The solution to this problem is to introduce the idea of "virtual nodes", which are replicas of cache points in the circle. So whenever we add a cache we create a number of points in the circle for it.

You can see the effect of this in the following plot which I produced by simulating storing 10,000 objects in 10 caches using the code described below. On the x-axis is the number of replicas of cache points (with a logarithmic scale). When it is small, we see that the distribution of objects across caches is unbalanced, since the standard deviation as a percentage of the mean number of objects per cache (on the y-axis, also logarithmic) is high. As the number of replicas increases the distribution of objects becomes more balanced. This experiment shows that a figure of one or two hundred replicas achieves an acceptable balance (a standard deviation that is roughly between 5% and 10% of the mean).


Implementation

For completeness here is a simple implementation in Java. In order for consistent hashing to be effective it is important to have a hash function thatmixes well. Most implementations of Object's hashCode do not mix well - for example, they typically produce a restricted number of small integer values - so we have a HashFunction interface to allow a custom hash function to be used. MD5 hashes are recommended here.


import java.util.Collection;
import java.util.SortedMap;
import java.util.TreeMap;

public class ConsistentHash {

private final HashFunction hashFunction;
private final int numberOfReplicas;
private final SortedMap circle =
new TreeMap();

public ConsistentHash(HashFunction hashFunction,
int numberOfReplicas, Collection nodes) {

this.hashFunction = hashFunction;
this.numberOfReplicas = numberOfReplicas;

for (T node : nodes) {
add(node);
}
}

public void add(T node) {
for (int i = 0; i < numberOfReplicas; i++) {
circle.put(hashFunction.hash(node.toString() + i),
node);
}
}

public void remove(T node) {
for (int i = 0; i < numberOfReplicas; i++) {
circle.remove(hashFunction.hash(node.toString() + i));
}
}

public T get(Object key) {
if (circle.isEmpty()) {
return null;
}
int hash = hashFunction.hash(key);
if (!circle.containsKey(hash)) {
SortedMap tailMap =
circle.tailMap(hash);
hash = tailMap.isEmpty() ?
circle.firstKey() : tailMap.firstKey();
}
return circle.get(hash);
}

}


The circle is represented as a sorted map of integers, which represent the hash values, to caches (of type T here).
When a ConsistentHash object is created each node is added to the circle map a number of times (controlled by numberOfReplicas). The location of each replica is chosen by hashing the node's name along with a numerical suffix, and the node is stored at each of these points in the map.

To find a node for an object (the get method), the hash value of the object is used to look in the map. Most of the time there will not be a node stored at this hash value (since the hash value space is typically much larger than the number of nodes, even with replicas), so the next node is found by looking for the first key in the tail map. If the tail map is empty then we wrap around the circle by getting the first key in the circle.

Usage

So how can you use consistent hashing? You are most likely to meet it in a library, rather than having to code it yourself. For example, as mentioned above, memcached, a distributed memory object caching system, now has clients that support consistent hashing. Last.fm's ketama by Richard Jones was the first, and there is now a Java implementation by Dustin Sallings (which inspired my simplified demonstration implementation above). It is interesting to note that it is only the client that needs to implement the consistent hashing algorithm - the memcached server is unchanged. Other systems that employ consistent hashing include Chord, which is a distributed hash table implementation, and Amazon's Dynamo, which is a key-value store (not available outside Amazon).

Mercurial & Maven

Tutorial - Cloning a repository

(This page is part 2 of 9 of the Tutorial series. Previous part is TutorialInstall, next part is TutorialHistory)

You have followed TutorialInstall to install Mercurial already, right? Good!

In Mercurial, we do all of our work inside a repository. A repository is a directory that contains all of the source files that we want to keep history of, along with complete histories of those source files.

The easiest way to get started with Mercurial is to use a repository that already contains some files and some history.

To do this, we use the clone command. This makes a clone of a repository; it makes a complete copy of another repository so that we will have our own local, private one to work in.

Let's clone a small "hello, world" repository hosted at selenic.com:

$ hg clone http://www.selenic.com/repo/hello my-hello 

If all goes well, the clone command prints this (Mercurial 1.0):

requesting all changes adding changesets adding manifests adding file changes added 2 changesets with 2 changes to 2 files updating working directory 2 files updated, 0 files merged, 0 files removed, 0 files unresolved 

We should now find a directory called my-hello in our current directory:

$ ls my-hello 

Inside the my-hello directory, we should find some files:

$ ls my-hello Makefile  hello.c 

These files are exact copies of the files in the repository we just cloned.

Note: in Mercurial, each repository is self-contained. When you clone a repository, the new repository becomes an exact copy of the existing one at the time of the clone, but subsequent changes in either one will not show up in the other unless you explicitly transfer them, by either pulling or pushing.

By default, hg clone checks out (see Update) the tipmost revision of the repository into the repository's working directory. To see which revision is currently checked out, we can use the parents command:

$ cd my-hello $ hg parents changeset:   1:82e55d328c8c tag:         tip user:        mpm@selenic.com date:        Fri Aug 26 01:21:28 2005 -0700 summary:     Create a makefile 

At this point, we can start examining some of the history of our new repository, by continuing to TutorialHistory.


Maven in 5 Minutes

Installation

Maven is a Java tool, so you must have Java installed in order to proceed.

First, download Maven and follow the installation instructions. After that, type the following in a terminal or in a command prompt:

mvn --version 

It should print out your installed version of Maven, for example:

Maven version: 2.0.8 Java version: 1.5.0_12 OS name: "windows 2003" version: "5.2" arch: "x86" Family: "windows" 

Depending upon your network setup, you may require extra configuration. Check out the Guide to Configuring Maven if necessary.

Creating a Project

On your command line, execute the following Maven goal:

mvn archetype:create -DgroupId=com.mycompany.app -DartifactId=my-app 

If you have just installed Maven, it may take a while on the first run. This is because Maven is downloading the most recent artifacts (plugin jars and other files) into your local repository. You may also need to execute the command a couple of times before it succeeds. This is because the remote server may time out before your downloads are complete. Don't worry, there are ways to fix that.

You will notice that the create goal created a directory with the same name given as the artifactId. Change into that directory.

cd my-app 

Under this directory you will notice the following standard project structure.

my-app |-- pom.xml `-- src     |-- main     |   `-- java     |       `-- com     |           `-- mycompany     |               `-- app     |                   `-- App.java     `-- test         `-- java             `-- com                 `-- mycompany                     `-- app                         `-- AppTest.java 

The src/main/java directory contains the project source code, the src/test/java directory contains the test source, and the pom.xml is the project's Project Object Model, or POM.

The POM

The pom.xml file is the core of a project's configuration in Maven. It is a single configuration file that contains the majority of information required to build a project in just the way you want. The POM is huge and can be daunting in its complexity, but it is not necessary to understand all of the intricacies just yet to use it effectively. This project's POM is:

   4.0.0   com.mycompany.app   my-app   jar   1.0-SNAPSHOT   Maven Quick Start Archetype   http://maven.apache.org               junit       junit       3.8.1       test          

What did I just do?

You executed the Maven goal archetype:create, and passed in various parameters to that goal. The prefix archetype is the plugin that contains the goal. If you are familiar with Ant, you may concieve of this as similar to a task. This goal created a simple project based upon an archetype. Suffice it to say for now that a plugin is a collection of goals with a general common purpose. For example the jboss-maven-plugin, whose purpose is "deal with various jboss items".

Build the Project

mvn package 

The command line will print out various actions, and end with the following:

 ... [INFO] ------------------------------------------------------------------------ [INFO] BUILD SUCCESSFUL [INFO] ------------------------------------------------------------------------ [INFO] Total time: 2 seconds [INFO] Finished at: Thu Oct 05 21:16:04 CDT 2006 [INFO] Final Memory: 3M/6M [INFO] ------------------------------------------------------------------------ 

Unlike the first command executed (archetype:create) you may notice the second is simply a single word - package. Rather than a goal, this is a phase. A phase is a step in the build lifecycle, which is an ordered sequence of phases. When a phase is given, Maven will execute every phase in the sequence up to and including the one defined. For example, if we execute the compile phase, the phases that actually get executed are:

  1. validate
  2. generate-sources
  3. process-sources
  4. generate-resources
  5. process-resources
  6. compile

You may test the newly compiled and packaged JAR with the following command:

java -cp target/my-app-1.0-SNAPSHOT.jar com.mycompany.app.App 

Which will print the quintessential:

Hello World! 

Running Maven Tools

Maven Phases

Although hardly a comprehensive list, these are the most common default lifecycle phases executed.

  • validate: validate the project is correct and all necessary information is available
  • compile: compile the source code of the project
  • test: test the compiled source code using a suitable unit testing framework. These tests should not require the code be packaged or deployed
  • package: take the compiled code and package it in its distributable format, such as a JAR.
  • integration-test: process and deploy the package if necessary into an environment where integration tests can be run
  • verify: run any checks to verify the package is valid and meets quality criteria
  • install: install the package into the local repository, for use as a dependency in other projects locally
  • deploy: done in an integration or release environment, copies the final package to the remote repository for sharing with other developers and projects.

There are two other Maven lifecycles of note beyond the default list above. They are

  • clean: cleans up artifacts created by prior builds
  • site: generates site documentation for this project

Phases are actually mapped to underlying goals. The specific goals executed per phase is dependant upon the packaging type of the project. For example,package executes jar:jar if the project type is a JAR, and war:war is the project type is - you guessed it - a WAR.

An interesting thing to note is that phases and goals may be executed in sequence.

mvn clean dependency:copy-dependencies package 

This command will clean the project, copy dependencies, and package the project (executing all phases up to package, of course).

Generating the Site

mvn site 

This phase generates a site based upon information on the project's pom. You can look at the documentation generated under target/site.

Consistent hashing

From Wikipedia .. 

Consistent hashing is a scheme that provides hash table functionality in a way that the addition or removal of one slot does not significantly change the mapping of keys to slots. In contrast, in most traditional hash tables, a change in the number of array slots causes nearly all keys to be remapped. By using consistent hashing, only K/n keys need to be remapped on average, where K is the number of keys, and n is the number of slots.

Consistent hashing was introduced in 1997 as a way of distributing requests among a changing population of web servers. Each slot is then represented by a node in a distributed system. The addition (joins) and removal (leaves/failures) of nodes only requires K/n items to be re-shuffled when the number of slots/nodes change. More recently it has been used to reduce the impact of partial system failures in large web applications as to allow for robust caches without incurring the system wide fallout of a failure [1] [2].

However, the most significant application of consistent hashing has been to form the foundation of distributed hash tables (DHTs). DHTs use consistent hashing to partition a keyspace among a distributed set of nodes, and additionally provide an overlay network which connects nodes such that the node responsible for any key can be efficiently located.


From (http://www.spiteful.com/2008/03/17/programmers-toolbox-part-3-consistent-hashing/)

Let’s say you’re a hot startup and your database is starting to slow down. You decide to cache some results so that you can render web pages more quickly. If you want your cache to use multiple servers (scale horizontally, in the biz), you’ll need some way of picking the right server for a particular key. If you only have 5 to 10 minutes allocated for this problem on your development schedule, you’ll end up using what is known as the naïve solution: put your N server IPs in an array and pick one using key % N.

I kid, I kid — I know you don’t have a development schedule. That’s OK. You’re a startup.

Anyway, this ultra simple solution has some nice characteristics and may be the right thing to do. But your first major problem with it is that as soon as you add a server and change N, most of your cache will become invalid. Your databases will wail and gnash their teeth as practically everything has to be pulled out of the DB and stuck back into the cache. If you’ve got a popular site, what this really means is that someone is going to have to wait until 3am to add servers because that is the only time you can handle having a busted cache. Poor Asia and Europe — always getting screwed by late night server administration.

You’ll have a second problem if your cache is read-through or you have some sort of processing occurring alongside your cached data. What happens if one of your cache servers fails? Do you just fail the requests that should have used that server? Do you dynamically change N? In either case, I recommend you save the angriest twitters about your site being down. One day you’ll look back and laugh. One day.

As I said, though, that might be OK. You may be trying to crank this whole project out over the weekend and simply not have time for a better solution. That is how I wrote the caching layer for Audiogalaxy searches, and that turned out OK. The caching part, at least. But if had known about it at the time, I would have started with a simple version of consistent hashing. It isn’t that much more complicated to implement and it gives you a lot of flexibility down the road.

The technical aspects of consistent hashing have been well explained in other places, and you’re crazy and negligent if you use this as your only reference. But, I’ll try to do my best. Consistent hashing is a technique that lets you smoothly handle these problems:

  • Given a resource key and a list of servers, how do you find a primary, second, tertiary (and on down the line) server for the resource?
  • If you have different size servers, how do you assign each of them an amount of work that corresponds to their capacity?
  • How do you smoothly add capacity to the system without downtime? Specifically, this means solving two problems:
    • How do you avoid dumping 1/N of the total load on a new server as soon as you turn it on?
    • How do you avoid rehashing more existing keys than necessary?

In a nutshell, here is how it works. Imagine a 64-bit space. For bonus points, visualize it as a ring, or a clock face. Sure, this will make it more complicated when you try to explain it to your boss, but bear with me:

consistent_hashing_simple.png

That part isn’t very complicated.

Now imagine hashing resources into points on the circle. They could be URLs, GUIDs, integer IDs, or any arbitrary sequence of bytes. Just run them through MD5 or SHA and shave off everything but 8 bytes (and if anyone tells you that you shouldn’t use MD5 for this because it isn’t secure, just nod and back away slowly. You have identified someone not worth arguing with). Now, take those freshly minted 64-bit numbers and stick them onto the circle:

consistent_hashing_resources.png

Finally, imagine your servers. Imagine that you take your first server and create a string by appending the number 1 to its IP. Let’s call that string IP1-1. Next, imagine you have a second server that has twice as much memory as server 1. Start with server #2’s IP, and create 2 strings from it by appending 1 for the first one and 2 for the second one. Call those strings IP2-1 and IP2-2. Finally, imagine you have a third server that is exactly the same as your first server, and create the string IP3-1. Now, take all those strings, hash them into 64-bit numbers, and stick them on the circle with your resources:

consistent_hashing_full.png

Can you see where this is headed? You have just solved the problem of which server to use for resource A. You start where resource A is and head clockwise on the ring until you hit a server. If that server is down, you go to the next one, and so on and so forth. In practice, you’ll want to use more than 1 or 2 points for each server, but I’ll leave those details as an exercise for you, dear reader.

Now, allow me to use bullet points to explain how cool this is:

  • Assuming you’ve used a lot more than 1 point per server, when one server goes down, every other server will get a share of the new load. In the case above, imagine what happens when server #2 goes down. Resource A shifts to server #1, and resource B shifts to server #3 (Note that this won’t help if all of your servers are already at 100% capacity. Call your VC and ask for more funding).
  • You can tune the amount of load you send to each server based on that server’s capacity. Imagine this spatially – more points for a server means it covers more of the ring and is more likely to get more resources assigned to it.

    You could have a process try to tune this load dynamically, but be aware that you’ll be stepping close to problems that control theory was built to solve. Control theory is more complicated than consistent hashing.

  • If you store your server list in a database (2 columns: IP address and number of points), you can bring servers online slowly by gradually increasing the number of points they use. This is particularly important for services that are disk bound and need time for the kernel to fill up its caches. This is one way to deal with the datacenter variant of the Thundering Herd Problem.

    Here I go again with the control theory — you could do this automatically. But adding capacity usually happens so rarely that just having somebody sitting there watching top and running SQL updates is probably fine. Of course, EC2 changes everything, so maybe you’ll be hitting the books after all.

  • If you are really clever, when everything is running smoothly you can go ahead and pay the cost of storing items on both their primary and secondary cache servers. That way, when one server goes down, you’ve probably got a backup cache ready to go.

Pretty cool, eh?

I want to hammer on point #4 for a minute. If you are building a big system, you really need to consider what happens when machines fail. If the answer is “we crush the databases,” congratulations: you will get to observe a cascading failure. I love this stuff, so hearing about cascading failures makes me smile. But it won’t have the same effect on your users.

Finally, you may not know this, but you use consistent hashing every time you put something in your cart at Amazon.com. Their massively scalable data store, Dynamo, uses this technique. Or if you use Last.fm, you’ve used a great combination: consistent hashing + memcached. They were kind enough to release their changes, so if you are using memcached, you can just use their code without dealing with these messy details. But keep in mind that there are more applications to this idea than just simple caching. Consistent hashing is a powerful idea for anyone building services that have to scale across a group of computers.

A few more links: